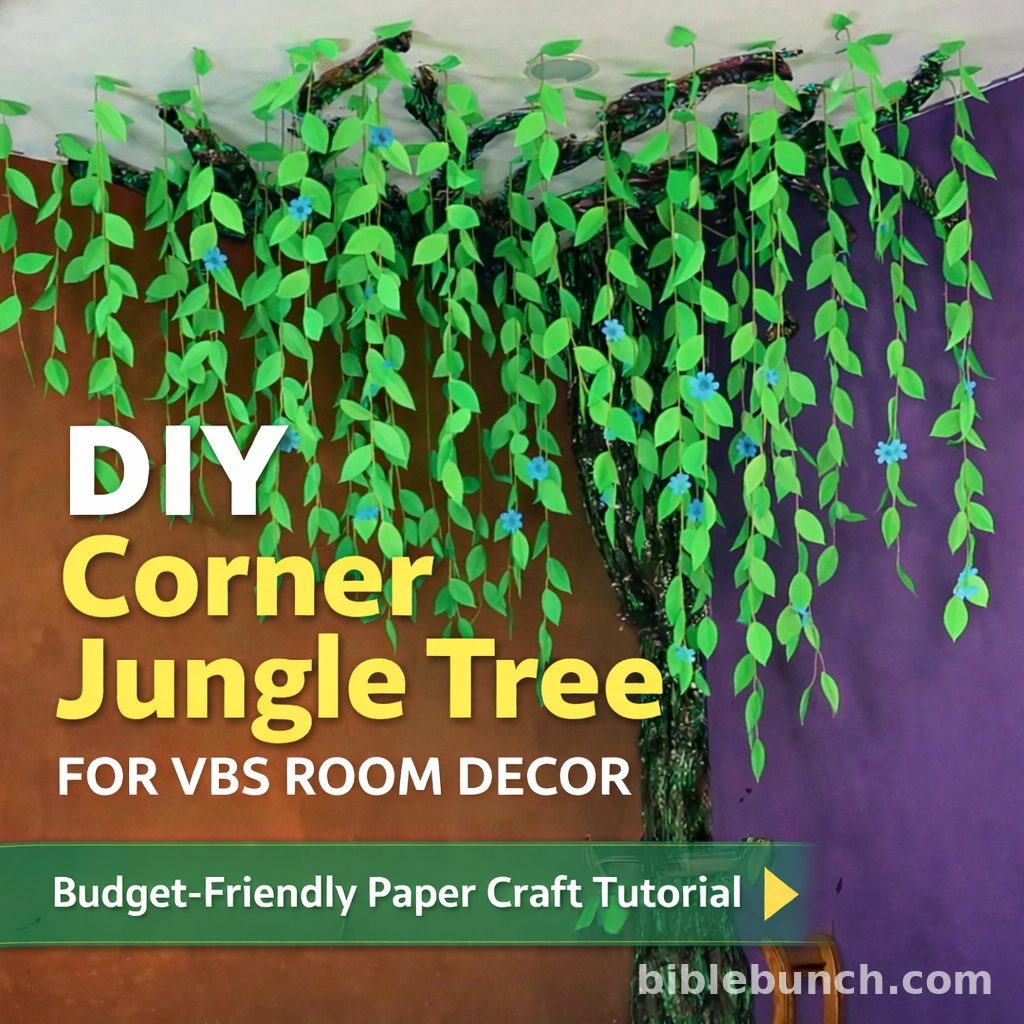
Transform a Plain Corner into an Immersive Jungle Canopy
If you’re planning a Rainforest, Jungle, or Nature-themed Vacation Bible School, this dramatic corner jungle tree instantly changes the feel of the entire room. It uses vertical space, creates depth, and makes children feel like they’ve stepped into a different environment — without requiring expensive materials.
This tutorial is written for busy VBS volunteers who need something simple, scalable, and visually powerful.
Overview of the Design
This décor element includes:
- A cardboard corner tree trunk
- Ceiling-mounted branches extending outward
- Hanging paper vine strands with leaves
- Optional paper flowers for added color
The layered hanging canopy is what creates the immersive jungle effect.
Materials List
Structural Materials
- Large cardboard sheets or appliance boxes
- Brown craft paper or bulletin board paper
- Black or dark brown paint (optional)
- Strong packing tape
- Staple gun
- Hot glue gun (high temperature preferred)
- Fishing line or thin clear string
- Zip ties (optional)
Leaf & Vine Materials
- Green cardstock (2–3 shades recommended)
- Light green construction paper
- Blue cardstock (optional for small flowers)
- Scissors or paper cutter
- Simple leaf template (elongated oval shape works well)
Mounting Supplies
- Painter’s tape
- Command hooks (ceiling-safe option)
- Push pins (if ceiling tiles allow)
- Stable ladder
Step 1: Build the Corner Tree Trunk
- Cut cardboard into tall panels that fit snugly into the corner.
- Tape panels together to create height (6–8 feet recommended).
- Slightly bend or layer cardboard for dimension.
- Wrap with brown craft paper.
- Add darker streaks or dry-brush paint for bark texture.
Tip: Lightly crumpling the paper before attaching creates a more realistic bark look.
Step 2: Create Ceiling Branches
Cut large curved branch shapes from cardboard.
Paint dark brown or black for contrast.
Attach along the ceiling edge extending outward from the trunk corner.
Branches should spread 3–5 feet across the ceiling to create a canopy feel.
Once leaves hang down, minor imperfections won’t be noticeable.
Step 3: Make the Hanging Leaf Vines
- Cut leaves in multiple shades of green.
- Ideal leaf size: 3–5 inches long.
- Batch cut by stacking paper to save time.
Cut string in varied lengths:
- 3 feet
- 4 feet
- 5 feet
Attach leaves along the string, alternating sides for a natural look.
Leave 2–4 inches between leaves.
Optional: Add small blue flowers occasionally for color variation.
Create 20–40 strands depending on fullness desired.
Step 4: Install the Hanging Canopy
Start near the trunk and work outward.
Attach vines using staples, tape, or command hooks.
Vary length and spacing for layered depth.
Let some vines hang lower near the trunk for dramatic effect.
The goal is a curtain of greenery from ceiling to floor.
Step 5: Add Finishing Touches
To enhance immersion:
- Place green fabric or paper at the base for a forest floor
- Add artificial ivy around the trunk
- Use soft green uplighting
- Add subtle jungle sound effects during VBS transitions
These small additions significantly increase impact.
Safety Guidelines
- Always use a stable ladder
- Never stand on chairs
- Avoid permanent adhesives on ceiling tiles
- Have adults handle ceiling installation
Safety matters more than aesthetics.
Scaling the Design
Small Classroom Version
- Shorter vines
- Fewer branches
- Compact trunk
Large Worship Space Version
- Thicker branch structure
- Multi-layer canopy
- Add jungle animal cutouts
- Incorporate themed lighting
Why This Works for VBS
Children remember environments. When they walk into a room and see greenery hanging from above, it signals that something special is happening. Immersive décor increases engagement, supports the theme, and helps reinforce the week’s message.
This design is simple, affordable, and volunteer-friendly — but visually impressive enough to transform the entire room.